Monday, April 29, 2013

Homemade Fudgies - Chocolate Fudge Brownies

What's your favorite brownie?
Where can we buy them?

Well, mine's easy. KFC. Yup! I sure love those KFC Signature Brownies - chewy base brownies with chocolate glaze and choco chip toppings.  Definitely, a choco overloaded goodness!

KFC Signature Brownies
If you like them as much as I do, you are in sheer luck cause I just bumped into a recipe, which with little bits of modification, tastes as good as KFC's brownies. Now, we can make as many of our favorite brownies at home >:)

Baked Brownie Recipe

Ingredients:
    Baked Brownies
  • 1 1/4 cups all-purpose flour
  • 1 tsp salt
  • 2 Tbsp cocoa powder (Bensdorp)
  • 275 grams bitter-sweet chocolate, coarsely chopped (Nova)
  • 1 cup unsalted butter, cut into 1-inch pieces
  • 1 tsp instant coffee powder (NESCAFÉ Classic)
  • 1 1/2 cups + 2 Tbsp white sugar
  • 1/4 cup packed light brown sugar
  • 5 eggs, at room temperature
  • 2 tsp vanilla extract

Procedure:
  1. Preheat oven to 350°F. Grease and line 9x13 inch baking pan.
  2. In a medium bowl, whisk together flour, salt, and cocoa powder. Set aside.
  3. Put the chocolate, butter, and instant coffee powder in a large bowl and set it over a saucepan of simmering water (you may opt to use a double boiler for this), stirring occasionally, until the chocolate and butter are completely melted and smooth. Turn off heat, but keep the bowl over the water and add the white and brown sugar. Whisk until completely combined, then remove bowl from the pan. Mixture should be at room temperature.
  4. Add 3 eggs to the chocolate mixture and whisk until combined. Add remaining eggs and whisk until combined. Add the vanilla and stir until combined.
  5. Sprinkle flour mixture over the chocolate mixture. Use a rubber spatula, fold the flour mixture into the chocolate until just a bit of the flour mixture is visible.
  6. Pour batter into prepared pan. Smooth the top. Bake for 30 minutes until a toothpick inserted into the center of the brownies comes out with a few moist crumbs sticking to it.
  7. Let the brownies cool completely. Remove from pan. cut into squares and chill.

Foodnotes:
> For step 4, do not over-beat the batter as this may result to a cakey textured brownies.
> For step 5, remember to use a spatula (not a whisk) to fold the flour mixture into the chocolate mixture.
> You may add some nuts in the recipe.

written by: Shobe

Monday, April 22, 2013

Summer Delight: Deep Fried Oreos

Deep-Fried Oreos, a carnival favorite,  is a tasty treat that surfaced few years back. Oreos get dipped in funnel cake batter and fried to perfection.

"Witness the magic of Oreo cookies being deep fried!"  
"So so so bad, yet so so so good." 

Easy and Simple Deep-Fried Oreo Recipe

Deep Fried Oreo - IngredientsIngredients:
  • 1 egg
  • 1/3 cup water
  • Magnolia waffle mix (small pack)
  • Oil - for deep frying
  • 1 pack original Oreos
  • Powdered sugar - for dusting
 Procedure:
  1. Heat oil for deep frying. Have 3 inches of oil hot and ready.
  2. Whisk together egg and water in a bowl until smooth. Stir in waffle mix until no dry lumps remain.
  3. When oil is hot enough, dip each Oreo into batter one at a time, then carefully place into hot frying oil. Fry only 4 or 5 at a time to avoid overcrowding. Cook until golden brown on each side.
  4. Remove from oil, drain, then dust with powdered sugar.
Deep Fried Oreos

Foodnotes: 
> For proper deep-frying technique, maintain the oil's temperature between 325°F and 400°F. Keeping the oil hot is critical to producing a quality product. The key is to fry items in small batches, because putting too much food in the oil all at once will lower the oil's temperature.

written by: Shobe

Wednesday, April 17, 2013

Sun, Sea, and Shrimp! - Shrimp Dynamite

Checklist:
- Sun (check!)
- Sea (check!)
- Fabulous Shrimp Appetizer (you could actually check it now, as we're sharing an easy tangy shrimp recipe ;) - see below)

Shrimp Dynamite Recipe

Ingredients:
  • 1/4 kg shelled and deveined medium-sized shrimp
  • Oil - for deep-frying
Batter:
  • 1/4 cup all-purpose flour, sifted
  • 1/4 cup cornstarch
  • 1/2 tsp baking powder
  • 1 egg white
  • 50 ml water
  • 1 Tbsp oil
  • Salt to taste
Dressing:
  • 3 Tbsp mayo
  • 1 tsp honey
  • 1/2 tsp hot sauce (preferred: Tobasco) 
  • Squirt of lemon juice (appox. 1 tsp)
Procedure:
  1. Clean and rinse shrimp with cold running water. Pat dry, then set aside.
  2. Prepare batter - mix all ingredients together.
  3. Prepare dressing - mix all ingredients together.
  4. Add shrimp into the batter and coat evenly.
  5. Heat up a deep-fryer or a pot with oil for deep-frying. When the oil is heated, drop each shrimp gently. Deep fry until golden brown. Transfer fried shrimps out, drain excess oil or transfer to a bowl lined with paper towels.
  6. Remove paper towels and add Dressing into the bowl and toss around until all the shrimp are nicely coated.
  7. Serve!

Foodnotes:
> For a summer twist, you could actually add a can of fruit cocktail to the recipe. Drain fruit cocktail and mix with these dynamites. Whala! a Shrimp Dynamite Salad.

written by: Shobe

Thursday, April 11, 2013

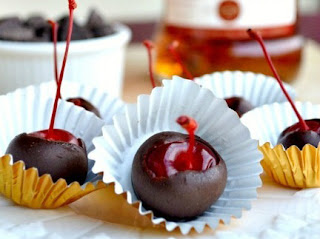
Quick Chocolate Fix: Tipsy Chocolate Cherries

When the craving hits hard, these should do the trick.

Tipsy Chocolate Cherries

Ingredients:
  • 1 jar (240 grams) maraschino cherries with stems, drained
  • brandy, enough to cover cherries in the jar
  • 2 cups semi-sweet chocolate, chopped
  • 2 Tbsp vegetable oil
Procedure:
  1. Fill drained jar of cherries with brandy. Screw on cap and refrigerate. (For cherries with more kick, steep in brandy for a week.)
  2. Drain cherries for 2 hours. Gently pat cherries dry with paper towels. 
  3. When ready to dip, place chocolate and vegetable oil in a small bowl. Melt over warm water and stir until smooth. Holding each by the stem, dip cherries one at a time until cherries are completely covered in melted chocolate.
  4. Place on a tray lined with plastic wrap.
  5. Freeze until chocolate is set, about 10 minutes
Recipe by: Tina C. Diaz

Wednesday, April 10, 2013

Ultimate Chocolate Chip Cookie Recipe

Competition for the title of Best Chocolate Chip Cookie Recipe is steep. Cookbooks, blogs, food sites claim they have the best recipe. But, are they certain? From the ones we've tried, by far this one's the winner.

"These are the cookies that appeared in the July 9, 2008 edition of the New York Times, the very same cookies that set off an explosion of baking across the Internet to see if, indeed, they are the perfect specimen. The consensus is yes." –David Leite

Ultimate Chocolate Chip Cookie Recipe

Ingredients:
  • 2 cups minus 2 Tbsp ( 8 1/2 ounces) cake flour
  • 1 2/3 cups (8 1/2 ounces) bread flour
  • 1 1/4 tsp baking soda
  • 1 1/2 tsp baking powder
  • 1 1/2 tsp kosher salt
  • 2 1/2 sticks (1 1/4 cups) unsalted butter, at room temperature
  • 1 1/4 cups (10 ounces) light brown sugar
  • 1 cup plus 2 Tbsp (8 ounces) granulated sugar
  • 2 pcs large eggs
  • 2 tsp natural vanilla extract
  • 1 1/4 pounds bittersweet chocolate disks or fèves, at least 60% cacao content
  • Sea salt
Procedure:
  1. Sift flours, baking soda, baking powder and kosher salt into a bowl. Set aside.
  2. Using a mixer fitted with paddle attachment, cream butter and sugars together until very light, about 5 minutes. Add eggs, one at a time, mixing well after each addition. Stir in the vanilla. Reduce speed to low, add dry ingredients and mix until just combined, 5 to 10 seconds. Drop chocolate pieces in and incorporate them without breaking them. Press plastic wrap against dough and refrigerate for 24 to 36 hours. Dough may be used in batches, and can be refrigerated for up to 72 hours.
  3. When ready to bake, preheat oven to 350° (176°C). Line a baking sheet with parchment paper or a nonstick baking mat. Set aside.
  4. Scoop six 3 1/2-ounce mounds of dough (the size of generous golf balls) onto baking sheet, making sure to turn horizontally any chocolate pieces that are poking up; it will make for a more attractive cookie. Sprinkle lightly with sea salt and bake until golden brown but still soft, 18 to 20 minutes. Transfer sheet to a wire rack for 10 minutes, then slip cookies onto another rack to cool a bit more. Repeat with remaining dough, or reserve dough, refrigerated, for baking remaining batches the next day. Eat warm.
Foodnotes:
>  For step 2, allowing the cookie dough to rest for 36 hours in the fridge is more recommended. The longer the dough stays in the fridge, the richer the taste.
> If your cookies are small in diameter and completely crispy after baking, then the dough was too cold and the cookies were over-baked. As per David, you could let the dough sit for 10 or even 15 minutes on the cookie sheet, and bake them for just the minimum time stated in the recipe.

Recipe by: David Leite | Photo by:  Francisco Tonelli

Tuesday, April 9, 2013

Bake Day: Going for the Perfect Cream Puffs

It starts with a crunch, followed by an ooze of light, velvety cold cream… Finishing off with a sugar-sweet taste.  Do you know what I’m talking about?? Or curious maybe?

The description above is simply the taste and feel experience when eating THE PERFECT CREAM PUFF.

A cream puffs’ exterior is supposedly crisp, having hollowed baked shells of choux pastry. Then, loads of pastry cream is filled into it for an explosive taste of surprise. For physical appeal, the baked creations are topped with variants of glaze. The simplest option would be to dust it with powdered sugar :)

April 8th – Our theme: “Cream Puff Galore”
With one of Cagayan De Oro’s home bakers, Karisse Contreras, the entire baking experience was made more special. (Karisse actually makes delicious blueberry cheese cupcakes, see below for sample)


Looks yummy, right?...  
Sorry to get your hopes up, but our bake day was actually scheduled for “Cream Puffs”. 
As for her famous cupcakes – let’s see if we could sweet talk her into sharing with us the secret recipe :)

What we’ll be sharing here is the basics on how to make cream puffs… From the pate choux (cream puff shell)… pastry cream... to the glaze on top! 


Pate Choux

Ingredients:
  • 1 cup water
  • 1/2 cup butter
  • 1/2 tsp salt
  • 1 cup all purpose flour
  • 4 pcs eggs
Egg Wash
  • 1 pc egg yolk
  • 1 Tbsp water
  • Pinch of salt
Procedure:
  1. Mix first 3 ingredients in a saucepan. Bring to boil.
  2. Remove from heat and stir in flour. 
  3. Return to heat and mix until mixture forms into a ball.
  4. Transfer to mixing bowl. Beat at low speed for a minute or until mixture is lukewarm.
  5. Add the eggs. (Do not add the eggs all at once. You can add 2 at a time)
  6. Check consistency, and texture. (Dough will resemble a smooth thick paste- it will fall from a spoon in slow motion, thick ribbon like. Add eggs if necessary to achieve desired texture )   
  7. Pipe as desired. Brush with egg wash.
  8. Bake in preheated 425 ̊F for 10 minutes.
  9. Lower the oven to 400 ̊F and bake 15 – 20 minutes until dry. Cool completely
Cream puffs

Foodnotes:
>For step 1, it is important that the butter melts before the water boils. Too much evaporation will affect the consistency of the dough.
> For step 6, if it is necessary to add more eggs, you could try adding only the egg whites (for crispier shells).
>Initial baking at high temperature (for 10 mins) is a must!- so the dough will rise quickly (leaving a hollow center) and to set the structure of the shells. The temperature is eventually reduced to allow the outsides of the shells to become firm and crisp, while allowing the insides of the shells to dry out.
>To keep the shells crisp, fill shells with cream shortly before serving.

Pastry Cream

Ingredients:
  • 2 cups fresh milk
  • 1/2 cup cornstarch
  • 1/2 cup sugar
  • 1/2 cup eggs
  • 2 pcs egg yolks
  • 1 tsp vanilla extract
  • 2 Tbsp butter
Procedure:
  1. Mix together 1 ½ cups of the milk and sugar. Scald.
  2. Mix together eggs, egg yolks, cornstarch and the rest of the milk.
  3. Temper the egg mixture.
  4. Bring the whole mixture back to the fire. Stir until a little bit thick. (Do not overcook, whisk constantly to prevent curdling) Flash bottom of pan in ice water.
  5. Transfer to bowl. Mix in vanilla and butter
  6. Cover with plastic wrap. Cool.
Chocolate Glaze

Ingredients:
  • 3 Tbsp water
  • 2 Tbsp heavy cream
  • 3 Tbsp light corn syrup
  • 1/2 cup sugar
  • 110 grams bittersweet chocolate
Procedure:
  1. In a saucepan, combine water, heavy cream, corn syrup, and sugar. Cook until sugar is dissolved.
  2. Pour over chocolate. Whisk until smooth.
Hard Caramel Glaze

Ingredients:
  • 1 cup sugar
  • 1/2 tsp calamansi
Procedure:
  1. Combine sugar and lemon in a saucepan. Mix until sugar resembles wet sand.
  2. Heat over medium fire without stirring.
  3. Heat just until sugar starts to melt around the sides of the pan or mixture begins to develop smoke. Stir sugar until it becomes liquid amber in color.  Turn off heat immediately.
written by: Shobe

Sugar-Coated "Candy's" - Candy's Cafe, Cagayan de Oro

Sweet as it may sound... Candy's is NOT all about dessert!

A bistro nestled in the midst of numerous acclaimed "franchised" restaurants, Candy's boast as Cagayan de Oro's sweet spot by offering reasonable priced gourmet dishes and desserts, with taste and quality comparable with its high-class counterparts =p

Here are some of our favorites:

Candy's Special Salad (P285) - My mom's favorite (we order it at EVERY visit!)
Fresh greens topped with generous servings of raisins, mangoes, candied walnuts, sliced apricots, and Japanese vinaigrette!

Candy's Special Salad @Candy's

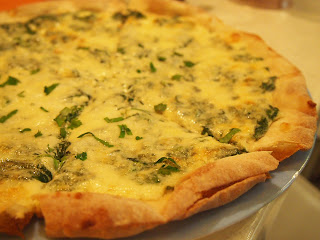
Spinach Pizza w/ Four Cheeses (P520)
Thin crust pizza, crisp to perfection...with LOADS of Spinach and Cheese!

Spinach Pizza w/ Four Cheeses @Candy's

Roast Beef Roti Wrap (P330)
Tender bits of well-seasoned beef, tomatoes and mayo-like dressing wrapped in soft tortilla

Roast Beef Roti Wrap @Candy's

Chicken Skewers (P275)
Tangy grilled pork barbecues served with hawaiian rice ;)

Chicken Skewers @Candy's


Chocolate Truffle Cake (P155)
YUMMY! Moist...Semi-sweet...Luscious Chocolate Cake with cherry filling (kind of like a black forest cake - a much tastier version though, hehe)

Chocolate Truffle Cake @Candy's

*Also must try - "Opera Cake" and "Tartufo"

Candy's Cafe
Rosario Arcade, Limketkai Mall

written by: Atchi

Wednesday, April 3, 2013

Cookie Characteristics!

What could be better than a batch of freshly baked chocolate chip cookies? NONE!
As nothing could replace my love for sweet, warm, and gooey chocolate chip cookies!

Come to think of it, these were probably my first baked creation...Still proud, even though my first batch of baked cookies came from a Pillsbury One-Step Cookie Mix :p

That's all in the past now... As this time, my palette's no longer satisfied with the instant stuff!

For a Cookie-Level-Up, try achieving these cookie characteristics by considering the factors that affect the texture and look of the cookie:

  • Crispness - low in moisture, high sugar and  high fat, longer baking time, smaller shape and size and proper storage
  • Softness - high in moisture, low sugar and low fat, shorter baking time, use of hygroscopic ingredients
  • Chewiness - high sugar and liquid content but low fat, high proportion of eggs, strong flour
  • Spread (some cookies should hold their shape and some should spread)
    • Increases spread - sugar, leavening, lower oven temperature, creaming, slack batter, heavily greased pans
    • Decreases spread - blending of fat and sugar -not creaming, higher oven temperature, strong flour, lower liquid content 

Foodnotes:
> Hygroscopic - the tendency to absorb moisture, which is a condition that occurs with some food products as they are exposed to high humidity. 
Example of Hygroscopic Ingredients: honey, molasses, corn syrup or glucose
> Cookie Characteristics taken from Heny Sison Culinary School EBPS notes

written by: Shobe

Tuesday, April 2, 2013

LoCo OvEr CHOCO?

In line with the theme Choco-Loco Summer, Cook and Bake is now spreading the CHOCOOoo-RIFIC experience.

You can start off by joining the photo contest!

Mechanics:
> Like our Cook&Bake page
www.facebook.com/Cook.Bake.Eat
> Take a picture of you & your favorite CHOCOLATE treat
> Email to info.cookandbake@gmail.com
with the subject: Photo Contest - <Name>

* Promo ends on April 12
Eligibility: Philippines only

Criteria:
Creativity (50%)
Photo-liciousness (50%)

Wednesday, March 27, 2013

You say Iloilo, I say Fooood!

I LOVE FOOD SOOOO MUCH… really, I do!
Actually, to the point of grabbing every FOOD trip opportunity. I especially love it when I’d get to organize the trip’s itinerary (this way, I’d get to schedule a stop at every food shop, pure bliss!)

Our recent trip was a food lover’s heaven! Scrumptious, Delicious, Tantalizing food was just EVERYWHERE! We literally spent 3 days of non-stop eating!

The list below cites some of the places I want to highlight. Thus, a SHOULD NOT MISS!

Afrique’s - a famous Italian restaurant in Iloilo, offering gourmet dishes
As an Italian restaurant, it takes pride in using fresh ingredients, with sauces made from scratch.

Before calling it a night, we decided to visit the place for a light evening snack. And I must say, it was well worth it! Dishes served were deliciously satisfying – the pastas were exceptionally great!

Must order these!
  • Carbonara - pasta: al dente; sauce: creamy and very flavorful
  • Lemonade with Cucumber - a refreshingly unique blend

Pizza, Pasta, Buffalo Wings @ Afrique's

Tatoy's Manokan and Seafoods - popular among locals and tourists. It serves Filipino - Ilonngo cuisine.

Must order these!
  • Lechon Manok - a house specialty; the BEST grilled native chicken in Iloilo!
  • Baked Oysters - fresh and overloaded with cheese and garlic
  • Kinilaw - sorry, no picture available – unfortunately it was devoured before I even got the opportunity to take a shot =( The raw fish was fully submerged in a distinct vinegar mix- bursting with Ilonggo flavors! A balance of sweet and sour, without the acidity that crinkles the nose.

Netong's - offer one of the best versions of the infamous Iloilo batchoy.
Iloilo is the “Home of Batchoy”, so NEVER leave the province without trying it- a mortal foodie sin!
Prior to my Iloilo visit, research through the internet disclosed unending foodie debates on who offers the best batchoy. Personally, I like Netong’s over Deco’s, as their version of the batchoy is tasty but not overly salty.


*Iloilo Delicacies for Pasalubong:

Roberto's - known for making the best and largest (It’s actually Gigantic in size!) siopao in Iloilo
The meat- filled dough was truly a culinary delight. The dough-wrap was soft yet firm, with an explosive filling of chicken adobo bits, pork adobo flakes, boiled eggs and Chinese sausage.

Royalties; such as the” King” or “Queen” Siopao include “SPECIAL” ingredients.

Must buy these!
  • King Siopao - the best seller:  Mantao (traditional Chinese steamed bread) filled with Roberto’s famous chicken pork filling, plus Ham
  • Queen Siopao - a limited edition, as it is only offered 3 or 4 days within a month. Also stuffed with Roberto's chicken pork filling, plus bacon

Panaderia de Molo - known for its artisan Spanish biscuits.
Must buy: Galletas

Original Biscocho Haus - also a famous Iloilo pasalubong stop-over. Offering wide varieties of sweets, breads, and pastries.
Must buy: Biscocho

Deocampo Barquillos - famous for Barquillos (crisp wafer rolls) since 1898. Deocampo's product line include; pinasugbo, biscocho, butterscotch, and many more.
Must buy: Barquillos

*Food Directory:

Afrique's
Red Square Bldg. 
Smallville Business Complex

Biscocho Haus
Lopez Jaena, Jaro

Deocampo Barquillos
46 Sta. Isabel, Jaro

Panaderia de Molo
Avaceña Street

Netong's Original Lapaz Batchoy
Inside Lapaz Public Market, Lapaz

Roberto’s Restaurant
#61 J.M. Basa Street

Tatoy’s Manokan and Seafoods
Barangay Sto. Niño Sur, Arevalo

written by: Shobe

Tuesday, March 26, 2013

It’s Summer, time for some Co-Co-Nut!

Summer’s finally here! And I bet you can’t wait to catch the waves and bathe in the sun=D
How about if I tell you that it’s possible to get the summer feel at the comfort of your home…
Then, you don’t have to wait a minute longer!

With the aroma of freshly baked coconut macaroon, you can’t help but breathe in the warmth and sweetness of summer… it reminds you of—lazing around in a hammock,  tanning beneath the sun’s rays, while drinking fresh coconut juice!

What are you waiting for- take out your baking pans and lets bring in the summer!

Coconut Macaroons

Ingredients:
  • 350 grams Sweet Shredded Coconut (or Desiccated Coconut)
  • 1/2 cup butter
  • 1/4 cup + 1 Tbsp white sugar
  • 3 eggs
  • 1 can condensed milk (300 ml)

Procedure:
  1. Preheat oven to 350 °F
  2. In a large mixing bowl, cream butter using a fork 
  3. Add the white sugar, eggs (one at a time) and condensed milk, while continuously stirring until well blended
  4. Add the Sweetened Shredded Coconut (Desiccated Coconut), then mix  
  5. Prepare the baking molds/ muffin tin by adding paper cups 
  6. Scoop a teaspoon of the coconut mixture into each cup
  7. Bake for 20 mins- 30 mins or until golden brown
  8. Cool. Then serve =)
Foodnotes:
How to keep cupcakes from sticking to the cupcake wrappers?
> Spray the inside of the cupcake wrappers with nonstick cooking spray before pouring the batter into them.
> Or, brush a very light coast of vegetable oil onto the insides of the paper liners with a pastry brush, making sure to get oil inside all the creases.

written by: Atchi

Monday, March 25, 2013

Kitchen Measurement Conversions


1 t =   1/6 fl.oz =        5 ml
1 T =     3 t =   1/2 fl.oz =      15 ml
1 C =   16 T =   48 t =      8 fl.oz =    240 ml
1 pt =   2 C =   32 T =   96 t =    16 fl.oz =    480 ml
1 Q = 2 pt =   4 C =   64 T = 192 t =    32 fl.oz =    960 ml
1 Gal = 4 Q = 8 pt = 16 C = 256 T = 768 t =  128 fl.oz = 3,840 ml

Oven thermometerOven Temperatures

°F   °C          Gas     Description
225   110        ¼      Very Cool
250   130        ½      Very Slow
275   140        1       Very Slow
300   150        2       Slow
325   165        3      Slow
350   177        4       Moderate
375   190        5       Moderate
400   200        6       Moderately Hot
425   220        7       Hot
450   230        8       Hot
475   245        9       Hot
500   260        10     Extremely Hot
550   290        10     Broiling

Sunday, March 24, 2013

Beyond Korea's Kimchi and Jjamppong

“Spontaneous”, the word that fully defined our “barkada” trip in Seoul. All I can remember was – without any itinerary on mind or in hand, we just packed our bags and bravely took a flight to a foreign land. Surprisingly though, for some of us who frequently travels, ideas were knitted spontaneously :|

Speaking of our college group’s Seoul travel, it was pretty much similar to our (not too long ago) thesis project, wherein deadlines force us to abruptly make reasonable decisions. I can’t say we weren’t successful, as we were able to visit countless historic places (even my feet can’t keep count, bcoz of sore and exhaust). As what we adventurous youngsters say: travels aren’t much fun without some added thrill! Let me share some of the thrill then, maybe it’d help you decide on booking your next trip to Korea :p -- we were chased by life- like zombies in a theme park; walked in circles.. after circles.. after circles (yeh! Admittedly, we got lost and no one there seemed to understand English), and of course, as with most tourist, we communicated via charades =D

(Tourist tip: Look for a person with a letter “i” on his hat- he could help you out with directions)

Though we had no itinerary on hand, we were fortunate enough to have tried some of Korea’s unique treats. By fortunate, I meant tasting Korean delicacies fit for a Filipino’s palette, of which my friends would whisper after every bite- “manamis-namis”


Savory Street BBQ

The very first street food I noticed was the “tender and juicy” looking Korean BBQ… By the looks of it, one couldn’t have guessed the type of meat coated under its thick brown sauce. Though, despite the uncertainty, we continuously devoured the grilled meat, picking a stick after another…  Good thing the stuff is made with white meat- Chicken!

School Food - Blooming Mari

This restaurant raves its deliciously cooked food, while authentically prepared the Korean way! 
The Beef Bokkeumbap is the Best! With rice cooked perfectly moist and fragrant…
As all fresh ingredients were mixed together, the plate itself was bursting with Asian flavors.

Street Vanilla Ice Cream

This particular Korean ice cream may not exactly taste extraordinary; yet, its distinctive shapes make it highly recommendable. I personally tried the “J” shaped cone, and true enough the shapes distinctiveness made it undeniably fun to eat. A plus: the cone remained crunchy till the last bite.

Tip: If travelling with a child, the J- shaped cone is truly a must try (While strolling, I saw a father carrying his child over his shoulders, and couldn't help but notice them sharing a J- shaped cone together, with the son eating the ice cream top- bottom while the father eating the same bottom- up.)

written by: Shobe

Thursday, March 21, 2013

Kitchen Basics - Your guide to 20 kitchen terms

Pasta - Al denteAl dente:  From the Italian phrase "to the tooth", it means cooking something such as pasta or vegetables until firm, not too hard and not too soft - left still slightly crisp.

Bain-marie: It is a term for hot water bath. A method used to ensure that food cooks evenly by immersing the container or pan in heated water.

Baste: A cooking technique for keeping meats and poultry moist while being cooked. It is to coat or brush food with sauce or its own juices.

Blanch: To quickly cook items in hot water and then plunge them into an ice water bath, which stops the cooking.This is often done to bring out color and preserve crispness.

Blind bake: To bake a pie crust or other pastry without the filling. To prevent puffing and slipping during baking, the pastry is lined with foil and filled with pie weights, dry beans, or uncooked rice. (I usually use dry beans.) These are removed shortly before the end of baking time to allow the crust to brown.

Brining: A process in which the meat is soaked in brine (or a salt solution) to ensure that it stays moist when cooked.

Curdling: Refers to the separation that occurs in egg or cream-based mixtures when they are heated to quickly.

Method: To cut inCut in: To mix butter or shortening into a dry ingredient (e.g. flour) using a fork, a pastry blender, or two knives. Though you can use your hands in a pinch, utensils are generally preferable as they will preserve the coldness of the fat, which affects the outcome of the final product.

Deglaze: To dissolve caramelized bits and food particles stuck on the bottom of a pan by adding liquid such as stock, wine, or even tomato sauce. Used to add more flavor to the dish or as a foundation for a sauce or gravy.

Emulsify: To combine two or more liquids that do not blend together easily, usually one that is fat and water based. For the liquids to combine properly, one is poured into the other while beating continuously.

Fold; Fold-in: To combine two ingredients or two combinations of ingredients by two motions; cutting vertically through the mixture and turning over and over by sliding the implement (usually a rubber spatula or wire whisk) across the bottom of the mixing bowl with each turn.

Ganache: A combination of chocolate and cream, melted together slowly. When used warm, ganache is poured over cakes or cookies to form a smooth glossy coating. Typically used as a sauce, frosting, or a glaze. If chilled, it can be formed into chocolate truffles.

Gratin: A culinary technique where the dish is topped with ingredients such as bread crumbs or grated cheese before being baked or broiled, creating a browned crust.

Julienne: To cut into thin strips or small, match-like pieces that are 1/8 of an inch wide and 1 to 2 inches long.

Poach: To simmer food in liquid (usually stock, though oil or even milk can be used) until it is cooked through. Eggs are usually associated with this cooking method, but anything from fish to fruit can be poached.

Reduce: Typically refers to the act of simmering or boiling liquid until it decreases, usually to achieve a thicker consistency or an intensified flavor.
Method: Tempering
Scald: Heating a liquid, usually milk, just below the boiling point.

Searing:  To brown food over high heat to lock in its juices. Food that is browned is usually braised or roasted to finish it off.

Simmer: A food preparation technique in which foods are cooked in hot liquids kept at or just below the boiling point of water.

Tempering: To temper means to gradually raise the temperature of an ingredient before adding it to a hot liquid, usually to prevent curdling.

Kitchen Basics - Tips on how to read a recipe correctly

FIVE STRATEGIES FOR RECIPE READING--AND COOKING SUCCESS!
  1. First, read the whole thing! Always carefully read through the entire recipe before preparing anything, so you aren't scrambling to retrieve the pepper mill from an overhead cabinet while your stir-fry comes dangerously close to burning. Remember: The order in which the ingredients are listed is usually the order in which they are used. Also, if a recipe says that a particular ingredient (for example, 1/2 cup olive oil) is "divided", that means that it won't be used all at once - so read the recipe and take note of when to add which amount.

  2. Take note of measurement notes. 1/4 cup melted butter" is different from "1/4 cup butter, melted". The former means that you melt enough butter to make 1/4 cup, measured in a liquid measuring cup. The latter, on the other hand, means that you simply take 1/4 cup butter in its solid state and melt it. The difference between the two is especially important to understand if you're baking, as the ingredients and instructions tend to be more precise in such recipes.

  3. Take note of measurement notes again. Just as "melted butter" and  "butter, melted" mean different things, "1/2 cup button mushrooms, sliced" and "1/2 cup sliced button mushroom" are not the same as well. If the manner in which the ingredient should be prepared comes after it (e.g., sliced), that usually means that you measure the ingredient (in this case, the mushrooms) before prepping them as instructed.

  4. Observe how food looks as it cooks. You'll often find instructions in recipes that tell you to cook something until it's translucent (onions), or fragrant (garlic), or brown (beef). Since every stove and pan is different, instructions that rely on your own senses are oftentimes more useful than telling you to cook something for a certain amount of time. This can be daunting for first-timers or novices, but don't be nervous: All it requires for you is to be present in the moment. Simply pay attention to what you're doing and you'll be fine.

  5. Polish your seasoning skills. Seasoning to taste means that you season the food as you go along, tasting it and adjusting as needed. Properly tasting the food is essential - how will you know if what you're making is good if you don't try it before serving it? It's better to add salt in increments, little by little, and then add more when required, for the simple reason that it's considerably easier to fix food that is under-seasoned than food that is overly salty.
Taken from Yummy 2011| by Liezl Yap

Foodnotes:
> If you are working in a fast paced kitchen environment, you could make your own recipe cheat sheet just to make sure you've taken note of everything (especially if there are slight changes with the recipe), and of course for convenience: (1) Use a 3" x 5" index card (2) Write the ingredients in order of which they are used in the left hand portion (3) Then, put a sequence number, and execution method per ingredient on the other side.

Tuesday, March 19, 2013

What you need for baking

A guide to the tools every home baker must have for a creative and stress-free time in the kitchen.

Silicone Oven Mitt
Silicone oven mitt
Heat-and slip-resistant, this mitt is also more durable than cloth potholders or oven mitts. It's easy to clean and comes in many fun colors!

Classic blender
Classic BlenderThis handy tabletop kitchen machine will take you from beverage to dessert to sauces and dips for main dishes. It's also handy for grinding cookies and nuts, for puréeing vegetables and fruits, and even for crushing ice.

Cream whipper
This tool produces instant topping for desserts, pastries, coffee, and other beverages. The metal siphon is fitted with a nitrous oxide cartridge that makes almost-instant whipped cream without the need for a mixer or a wire whisk. The canister also comes with decorative tips to make perfect rosettes.

Cream Whipper
Measuring cups and spoons
The cups come in sets of four or five, measuring 1 cup, 1/2 cup, 1/3 cup, and 1/4 cup. There are sets that include 1/8 cup. Spoons come in a set of five or six - 1 tablespoon, 1/2 tablespoon, 1 teaspoon, 1/2 teaspoon, 1/4 teaspoon and 1/8 teaspoon.

Pastry BrushPastry brush
Get one that is made with food-grade bristles. It is used for greasing pans, basting food that is being roasted or for glazing food.

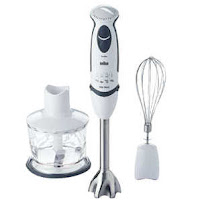
Handheld blender
This small appliance, also called an immersion blender, can be put directly into a pot of vegetables ready to be puréed, can easily emulsify yogurt into a sauce, and whip cream in no time at all.

Handheld Blender
Kitchen tongs
For baked goods, tongs are good for lifting baked dinner rolls from the pan, for serving slices of bar cookies, and for handling fritters or churros when frying.

Silicone baking mat
Just place it over the tray then pipe out pastry batter or drop cookie dough. No need to grease and flour baking trays anymore!

Silicone Baking MatMicroplane
When you need to zest a citrus fruit like lemon or orange, this fine grater with its stiff sharp blades is the best bet. It's also effective in grating hard spices like nutmeg and cinnamon and hard cheeses like Parmesan and Romano.

Glass measuring cup
With a pouring spout, it's clearly meant for measuring liquid ingredients.

Mixing Bowls
Mixing bowls
They can be made of glass, stainless steel, plastic, ceramic, or melamine. Stainless steel bowls are the most used as they are easy to clean, durable, and non-reactive to acids. Get a set that comes in at least four different sizes.

Dough scraper/ dough cutter
The rigid non-flexible type is best for scraping dough from the work surface as you knead it, while the soft, pliable ones can easily scrape any leftover dough or batter from a bowl.

Nonstick bakeware
Nonstick BakewareLined with nonstick coating, this type of pan is convenient because you can skip the greasing and lining. Be careful, though, as its capacity to retain heat can sometimes lead to too much browning or overcooking of the bottom potion of the product.

Pastry knife
This long knife can be used for slicing breads and cakes as well as for chopping chocolate, nuts, and fruits.

Thick aluminum baking pan
Choose pans that are solid in construction (meaning without too many seams) and sturdy enough to withstand the high heat of the oven and multiple use. Metal pans are often preferred over glass ones as they are easier to handle and release cakes easily when properly greased or floured.

Spatula
The tips are rounded and smooth, with the blade straight or angled (offset spatula). Use it for leveling off ingredients when measuring., and for applying fillings and frosting to cakes and pastries.

Timer
Timer
Make sure you don't overbake that delicate souffle or molten chocolate cake by having a timer on hand.

Utility / prep bowls
Colorful, microwave-safe utility bowls made from thick plastic are good for holding ingredients to be used or for short-term storing in the chiller.

Wire whisk
It's the best tool for whipping light ingredients like eggs and cream. The rounded metal wires serve to incorporate air into mixtures to make them light and airy.

Chopping BoardChopping board
Cutting boards have traditionally been made of hardwood, but today thermoplastic boards have become popular. Whatever type you choose, make sure it is big enough for all possible uses, thick enough so it does not warp easily, and nonslip for safety. Color-coded boards help ensure food sanitation. Have a set exclusively for chopping baking ingredients.

Wooden spoon
Great for mixing, beating, and cooking as it is lightweight and heat-resistant.

Rolling pin
Available in wood, stainless steel, marble, plastic and even canvas pastry cloth. The nonstick types are popular today as they don't need flouring like the wood ones, are easy to use and clean, and are lightweight.

Thermometer
An oven thermometer, to be slid in the oven, is handy. The other important thermometer to have on hand is a standard food thermometer for measuring the internal temperature of food when checking for doneness. You can choose between dial type, digital, and instant-read.

Stand MixerStand mixer
The KitchenAid mixer has been the partner of most bakers for years. It is durable, easy to clean, and ergonomically designed. It's not just for mixing doughs and batters or for whipping frostings and creams though. It can also make pasta, ice cream, and sausages using its various attachments.

Weighing Scale
Serious bakers and cooks are batter off weighing ingredients rather than using measuring cups and spoons. A scale is more precise and easier to use when preparing a large volume of food. A kitchen scale can be mechanical (like the spring scale and balance scale) or electronic (the ones that produce digital readouts).

Wire RackSilicone baking pans
Pans made from silicone can withstand very high temperatures without warping. Nonstick, they don't require greasing, are easy to use and clean, and very durable. Silicone pans come in various shapes and sizes, from cupcake molds to Bundt pans

Wire rack
Made from stainless steel or nonstick material, racks are needed for cooling freshly baked goods or when pouring glaze or thin icing over baked goods.

Taken from So-easy Sweets | Yummy